How I converted my old laptop into a personal server

I had an old laptop with me which was of no use. But I decided to use its resources so I set up this laptop as a personal LAN server first and then made it publicly accessible to others. So do you have an old laptop or PC? You can follow up with me to set up your own server. Let's get started.
1. Install Ubuntu
We need an operating system for the system. And there is no other option better than the best and most popular Linux distro ie Ubuntu
It is better to use the Ubuntu Server which is very lightweight and best for servers. But setting it up is a bit complex so we can also go with the desktop version.
Download Ubuntu LTS and set up a USB stick with Rufus in the window to make it bootable. Boot the machine with the USB and follow the basic setup to install ubuntu.
You can follow this youtube video: https://www.youtube.com/watch?v=cHF1ByFKtZo&t=371s
2. Setup SSH
SSH stands for Secure Shell or Secure Socket Shell, which is a network protocol that gives users, particularly system administrators, a secure way to access a computer over a network. So, we will set up ssh into our system so that it can be accessed from other devices to operate. For that the first thing we need is to set up a static IP for our Linux machine and the by using OpenSSH-server we will enable ssh.
- Update the packages
sudo apt update
- You need to change your IP to a static IP address. For getting your present IP type :
ip address
It is suggested to use Ethernet over Wifi for the server machine for faster speed. Wifi works well but it will slow down the process.
Go to your wired setting and then click on the setting icon in place of the connected network. Move to IP4 and select manual.
Provide the manual IP which should be identical to your LAN IP just change the last bits. Similarly provide the Netmask, gateway, and DNS.
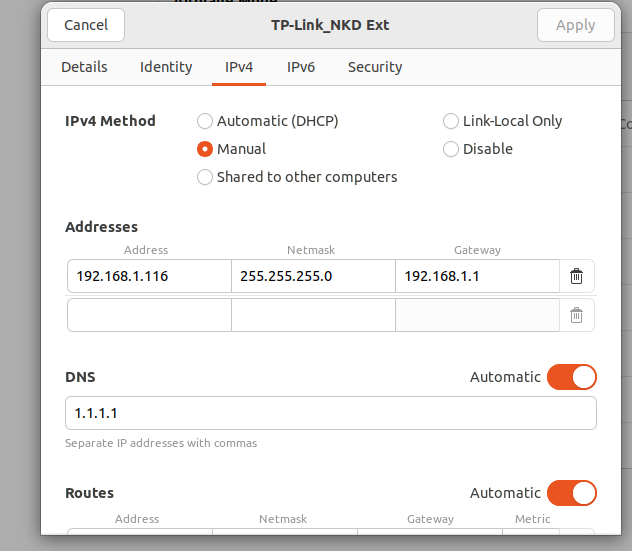
Reconnect the network and then check whether your IP got changed or not.
After this, we need to set up shh. For this, we will use
openssh-serverType:
sudo apt install openssh-server
- Check whether it is running or not
sudo systemctl status ssh
- After that, we need to allow ssh
sudo ufw allow ssh
- Now we are all set to go. Move to your window machine or any other system and then run the command below. Replace your
usernameandIP address.
ssh captcha@192.168.1.116
- Type
yesand then type the password of the user. And Walla!!.
You need to be connected to the same local network ie Wifi to ssh into the machine. It can be publicly accessible after following step 5.
3. Setup File sharing with Samba
The best way you can use this server is to backup your files into it or use it to share files within your devices connected over the LAN ie Wifi. We will see how you can connect your both window pc and mobile phone for file sharing.
- Install samba
sudo apt install samba
- Make a samba sharable folder
mkdir captcha-server
Go to samba config.
sudo nano /etc/samba/smb.confAdd the following code: Replace your
path,username, anddirectory name
    [captcha-server]
        comment = Captcha Shared Server
        path = /home/captcha/captcha-server
        read-only = no
        browsable = yes
        valid users = captcha
        available = yes
        guest ok = no
        writable = yes
- Save the file and restart the samba service
sudo service smbd restart
- Allow samba sharing
sudo ufw allow samba
- Add a user and password. Here captcha is my username
sudo smbpasswd -a captcha
Connect other devices for file transfer
Note: For connecting to the server you must be in the same network ie connected to the same wi-fi
Window
Go to my pc and select an add network location.
Add the network address. Replace your
IPanddirectory name
\\192.168.1.116\captcha-server
Add username and password and then done.
We are all set to access and transfer files from our window machine to the Linux server and vice versa
Phone
Go to file manager
Look for the remote option. Click LAN
Similarly, add
address, user, and password and connectWalla!! We have connected to the server.
Now you can back up your files on your old laptop.
4. Host a static webpage using NGINX
You can also use your server to host both static and dynamic web pages. We will be using NGINX for that.
NGINX is open-source software for web serving, reverse proxying, caching, load balancing, media streaming, and more.
- Install Nginx
sudo apt install nginx
- Go to /var/www and create a website directory
    cd /var/www
    mkdir test
    cd test
- Create a basic HTML page inside index.html
nano index.hmml
- Add this code to the file
<!DOCTYPE html>
<html>
<head>
<title>Welcome to nginx!</title>
<style>
html { color-scheme: light dark; }
body { width: 35em; margin: 0 auto;
font-family: Tahoma, Verdana, Arial, sans-serif; }
</style>
</head>
<body>
<h1>Welcome to nginx!</h1>
</body>
</html>
- Go to nginx directory and create a new nginx file
    cd /etc/nginx/sites-enabled
    nano first-webpage
- Add this code to the file. Replace your
directory namehere test
 server {
        listen 8080 default_server;
        listen [::]:8080 default_server;
root /var/www/test;
        index index.html index.htm index.nginx-debian.html;
        server_name _;
        location / {
                try_files $uri $uri/ =404;
        }
}
- Start/restart the Nginx server
sudo service nginx restart
- Go to <YOUR_IP>:8080 and walla your HTML page must be visible.
5. Make your server publicly accessible from anywhere
Till now whatever we have done is limited to our local network ie over the same wifi. But what if we want to share our server with our friends? For that, we need to implement port forwarding which will forward the requests made from the outside world to our server computer. There are many complex solutions but for me, the best and easy solution is to use Ngrok.
- Download ngrok setup file
wget https://bin.equinox.io/c/bNyj1mQVY4c/ngrok-v3-stable-linux-amd64.tgz
you can go to offical website for more download options
- Unzip the file
tar -xvzf /path/to/ngrok-v3-stable-linux-amd64.tgz
- Add auth token. You need to signup in the website for getting your auth token
./ngrok authtoken "Your auth token"
- Then use the desired port for forwarding
ngrok http 8080
here 8080 is the port where we have set up our Nginx server
You will get the public link. Open the link in the browser to view the Nginx webpage.
If you press
CTRL+C. It will close the output log as well as the ngrok service.
Run ngrok in a background process
There are many ways to run the ngrok in the background process. But after testing them all I found the best one;
- Just use this command to run ngrok in the background and log the output in a file.
sudo ngrok http 8080 --log=stdout > ngrok.log &
- Open the log file you will find the link.
nano ngrok.log
Port forwarding for ssh
You can also access your server through ssh
- Use the TCP and port 22 in ngrok
sudo ngrok tcp 22 --log=stdout > ngrok.log &
Open the log file and you will find the server address
Just ssh into it
# Assuming your URL was tcp://0.tcp.jp.ngrok.io:11111
ssh <YOUR_USERNAME>@0.tcp.jp.ngrok.io -p 11111
Conclusion
We made it this far 🎉. For us, the sky is the limit. You can host your Minecraft server and Video streaming server on your machine. Hope you have followed the steps correctly and got your desired results.
This is my blog post and hopes you enjoyed it. In return I just want you to like and share it with other techies. You can also comment down your queries and suggestions which are most welcome.